JDownloader very slow after upgrading to DSM7

I finally decided to upgrade my Synology NAS to the latest release and encountered several issues. One of them was that JDownloader had become very slow with a high cpu load. As the Oracle JAVA runtime isn’t supported (yet?) on DMS7 version you’ll have to switch to open JDK as the instructions indicate. Instead of a re-installation, I decided to keep my current JDownloader installation which seemed to work reasonably well until I started to download something which was very slow.

After some searching I found out that you’ll need to do a re-installation as the installation procedure installs a different version when using the openjdk runtime. After installation you could just copy the CFG folder to keep all your settings…. I compared the folders and the jar files where indeed different. However… the download speed was as slow as it was before 😦

This was caused because I used the DSM integrated runtime (interpreter!) instead of the one found in /volume1/@appstore/java-installer/bin/java

So check the JDownloader settings section to see if you’re running the wrong (=zerovm) version.

CH yoke servicing

Note: I can’t recommend doing this anymore, see my remark at the end.

With the release of MSFS I decided to pick up my old hobby again and install that old CH yoke. However, I noticed that moving the yoke had become difficult. After seeing this YouTube video which shows how to open the unit I decided to take a look inside to see if anything could be done about this. As my yoke is already quite old I decided to take a gamble and apply a lubricant which doesn’t contain grease for service locks. The idea is that it won’t cause more dust to get stuck again…

After spraying it looked like this:

It looks like a lot of oil has been applied but most of it dissipated. Next, I removed the excess residue before re-assembling the unit.

For now the yoke is working much better so let’s see how this will play out in a couple of weeks.

Warning: if you’d like to try do this yourself please test the spray on a plastic part to see if it does any damage.

Update – 28-11

Not totally unexpected, I can’t recommend doing this anymore as the effect has already waned of. It seems that the lubricant which I used did leave a very small amount of sticky residue and the performance has already degraded.

Litterbot 3 – yellow flashing light again and small improvements

My unit was working fine but finally the slowly flashing yellow light came back. I had already tried the usual improvements but didn’t help so I decided to replace the weight sensor. However, the problem still remained. Sometimes it just worked, and then it failed. I finally found the answer in this thread which gave the answer: it’s the lighting in the bonnet which is to blame as it also contains a sensor. As a quick fix you can disable the night light (press the on / off button for 5 seconds) or you’ll have to replace the entire bonnet. For now, the light has been turned off and the unit is working fine again.

After replacing the weight sensor I noticed that the pinch sensor metal bits were heavily corroded:

And via a small gap a lot of litter will get very close to it which will greatly accelerate the corrosion IMHO. As an experiment I used an acrylic sealant to close this gap. I’m very confident that this won’t stop the protection from working as it almost doesn’t stick to the plastic surface. So in my case I’m confident that the pinch protection still works fine but I can’t recommend you to do the same as it can be dangerous to the health of your cat(s). So please do some testing before you try this.

So there’s a sensor in the ligh module, cleaning it didn’t help

Hyper-V live migrations tips…

Here’s a list of various things which I encountered when doing live migrations of VMs between HyperV hosts. Maybe they’re helpful to other people as well.

  • If the VM uses DHCP then first configure it’s MAC address static so the  address stays the same (under network). Please note: this can’t be configured when the server is running and the same goes for the next item.
  • If the new host has different hardware enable the Compatibility Configuration under the processor options.
  • Enable the live migration (I didn’t use Kerberos) on both machines and temporarily disabled the firewall on the receiving machine
  • If the new host has different hardware enable the Compatibility Configuration under the processor options.
  • Launch a RDP session to the source machine and start the migration by selecting the server and chose move
  • After the migration, disable the Compatibility Configuration if it was enabled for best performance
  • Disable the live migration on both servers and re-enable the firewall

IMHO the kerberos authentication isn’t needed for the occasional migration in an isolated network segment.


I encountered two issues which took some time to figure out:

  • If you use Data Protection Manager you’ll first have to remove the VM’s from DPM before you can select them on the new host (refresh doesn’t work!)
  • Permissions error during migration? In my case the virtual machines group was missing from the snapshots folder on the destination server. Take a look at the original VM folder permissions and add it to the folder which needs this. This seems to be impossible from the GUI so start powershell and use these commands to add full control of this group to, for example, d:\hyperv

$sid=get-acl d:\hyperv

$sid.SetSecurityDescriptorSddlForm( ($sid.sddl + “(A;;FA;;;S-1-5-83-0)(A;OICIIO;0x101f01ff;;;S-1-5-83-0)”) )

set-acl d:\hyperv -AclObject $sid​


If you want a more secure, fine grained approach to set the folder permissions please take a look at this article.


  • Migrating from an older HyperV hosts (2012R) to server 2019 can result in a VM that won’t start with the network adapter being present. This can be caused by a bug – a work around is to change the MAC address.

And a new attempt fix the Litterbot problem…

Alas, in the end the previous idea didn’t turn out to be the definite fix as the issue suddenly came back. So let’s try something different… maybe it’s the contacts between the base and the bonnet which is causing the yellow light to blink? I had already cleaned them several times but I noticed some wear on them and the contacts aren’t working that well anymore.

To test this I’ve soldered a wire on both the base and the bonnet connectors and coupled  them as shown in this picture:

lb1

So let the testing begin…  🙂

Please note that it’s possible that this mod can damage the machine because the contacts are used as some kind of mechanism to detect overload. For example, maybe the globe pushes the bonnet up by design when it’s not able to rotate properly. Thus breaking the contact on purpose!

Litterbot 3 yellow light keeps flashing – update

Having 3 big cats made me look if the cleaning of the cat litter could be done automatically. The Litter robot III seemed like a perfect solution to me. However, about two or three times per week, the automatic cleaning process stopped permanently which didn’t help to keep tidy to put it mildly.

I contacted support and followed the suggestions but the problem remained. I tried this construction but that also didn’t help.

20180731_134252

However, after reading a lot of posts on support forums I noticed a suggestion which helped: apply a bit of oil to the inner-side so the bonnet has less resistance when turning. I applied some non-sticky lock oil and it helped. However, after a couple of weeks the problem returned. Next I tried cleaning the outside of the bonnet AND the base from all those really tiny bits and again it is worked for weeks without any problems until it needed cleaning again. So in the end it seems to be a combination of using a tiny bit of non-sticky lubricant and keeping the sliding parts really clean. I hope that a future revision will add some kind of bearings as the current design seems to be quite sensitive…

Let’s hope that this is the last update about this issue.


It seems that the problem is now finally solved… (again…)…. Cheers Jules!

edit-jules


Windows 10 – Hello options greyed out

This can happen when when your computer is connected to a domain and the domain policy settings (GPOs) have NOT been set as follows:

Computer Configuration \ Administrative Templates \ System \ Logon \ Turn on convenience PIN sign-in  – Not Configured

Computer Configuration \ Administrative Templates \ Windows Components \ Windows Hello for Business

Set all options to not configured. And apply the GPO (gpupdate.exe /force or reboot).

Is it still not working? Maybe there’s another GPO active or you have to clean the old (wrong) registry settings.

They’re located at

[HKEY_LOCAL_MACHINE\SOFTWARE\Policies\Microsoft\Windows\System]
"AllowDomainPINLogon"

and

HKEY_LOCAL_MACHINE\SOFTWARE\Policies\Microsoft\PassportForWork

Delete all the DWORD keys in there locations (not in the subfolders!).


So the options were greyed out because the setting was configured to enable it. Seems a little counter-intuitive to me….


Synology NAS slow transfers

I hadn’t looked into the file transfer speed of my ageing Synology DS413 getting slow. It turned out that my Windows 10 client was using a policy of requesting encrypted SMB.

The old CPU in the NAS couldn’t keep up with this and it really slowed transfers down. As encryption isn’t really an issue in a small home setup I decided to disable it on the NAS and the speeds immediately almost doubled. You can find the setting under Control Panel, File services, SMB, Advanced Settings. Set Transport encryption mode to disabled.

NAS


It may be necessary to change something on the Windows side should Microsoft require encrypted SMB in a future build but it’s working fine in the 1703 version.

Can’t apply Samsung 100GB OneDrive offer…

My Galaxy S7 phone came with a 2 year 100GB additional OneDrive storage space offer. However, when I tried to apply it from the OneDrive settings menu, the button did nothing.

A long support call to Samsung didn’t help much either but I did find post from Samsung support in Sweden which provided the solution.

Your phone comes bundled with several Microsoft apps: Excel, PowerPoint, Word, OneDrive and OneNote. If you’ve signed in to your MS account on any of these app besides OneDrive applying the offer will fail! So check them all and select sign out if possible. After this, the option worked as it should and my storage was increased with 100GB.

Making a Logitech Harmony work reliably with Kodi & Flirc

Getting a Harmony remote to correctly work with Kodi can be difficult. It often ends up with erratic key presses, repeating or not it’s even not working. Flirc is an USB dongle which presents itself as a keyboard. So in theory you can use the default keyboard setup with Kodi and have Flirc do the task of translating the codes to key presses. Should be simple without any messing around with Flirc (as I’m writing about Kodi on a raspberry Pi)…? It still takes some time to get it to work and with this post I’d like to share my experiences how I got I did this.

First of all, I created an activity in the Harmony software and added a multimedia PC keyboard. I just took a HP machine and then you have a nice mapping with all the keys you need. Now comes an important part, it turns out that the keys are working, but just as stated above, the behaviour was erratic and I ended up with a setup which I couldn’t use.

It turned out that the codes from Logitech’s database were causing most of the problems and I used a cheap MCE remote (from Ebay) to learn all the keys:

mceremote

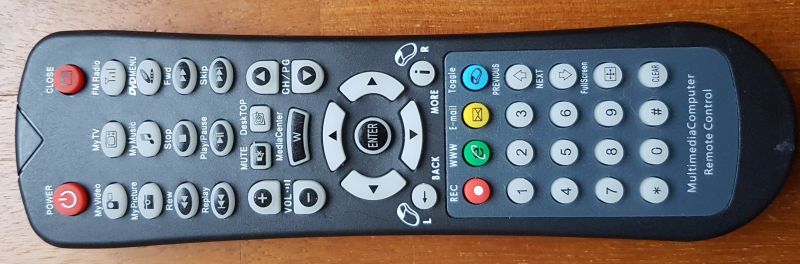
I don’t know how the others will do but here’s a link to get you started: Ebay

Please note: I don’t say that you have to use a MCE remote, maybe it will work just fine with another remote which you already have. Or maybe selecting another MCE remote setup from Logitech’s database works just fine for you?

I assume that you’re aware how you can setup an activity in the Logitech remote so configure the remote with the MCE machine as the “video device”. Check the “Customise buttons” option and make sure that all buttons, that you want to use, are mapped to the MCE device. When ready, Update the remote and enter the activity when everything’s ready so you can program the Flirc dongle.

So, startup the Flirc utility, which you already should have installed from the Flirc downloads page, and check the file menu and update the firmware if there’s a newer version available. I also recommend that you select the clear configuration option from there as well. Then, select full keyboard from the controllers menu and now the screen looks like this:

flirc

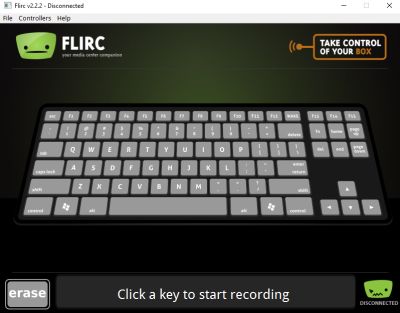
you’re now ready to start programming the keys described by the Kodi documentation

So, for example, map the STOP key to the X by pressing the X on the virtual keyboard and press your stop on your Logitech’s remote while it’s pointed at the Flirc dongle. So, when you press the STOP button the X key lights up in the Flirc desktop application.

When you’re done programming you can check the behaviour by opening a text editor on your computer and press all the keys to see if they’ve been mapped correctly and correct them if necessary.

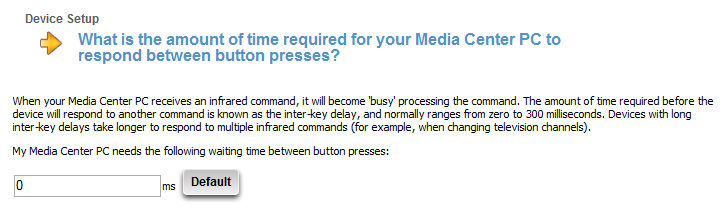
Now there’s another important setting in the Flirc tool under the file / advanced settings:  Configure the Inter-Key Delay to 5 or higher as shown here.

harm6

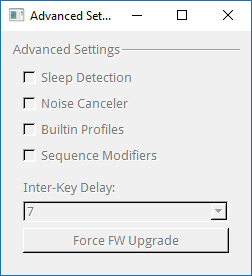
At the moment, I can’t recommend using the other settings but your mileage may vary.

Now you’re good to go to do some testing with Flirc attached to your Kodi machine. In my case, I first used an USB cable to get the Flirc receiver in the line of site of my remote sitting just next to my plasma TV. This turned out to be a problem as the plasma tv turned out to be interfering with the IR signal making control of Kodi difficult. So then I placed the receiver further backwards to get some more shielding from my TV.

For me, most keys now worked just fine although some still gave problems. I used the Kodi Kodi keymap addon to map the not working keys thus deviating from the original Kodi keymap in a couple of cases. The addon is a very useful tool to map more functions to your Harmony. For example, I mapped the 7 and 8 keys to subtitle delay and forward under full screen playback so you can use them for other purposes in an other Kodi activity.  Recommended!

Ok, but first, Kodi needs to function with the basic remote keys and it turned out that some extra settings need looked into.

As Logitech writes on their site the remote is often configured to repeat commands which some receivers need to work correctly. In my case with Flirc, the remote was sending the commands two times and Flirc picked this up most of the time. I can’t blame Logitech for this as I just selected a MCE remote based system earlier which probably needs this. But for Flirc it just works counter productive. So you’ll have to check your settings and get rid of it if necessary.

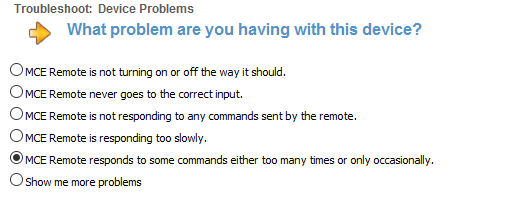
Go to the device options in the Harmony software, select your activity and select Troubleshoot. Skip the first screen and select Yes and select the MCE remote and select the option shown here:

harm1

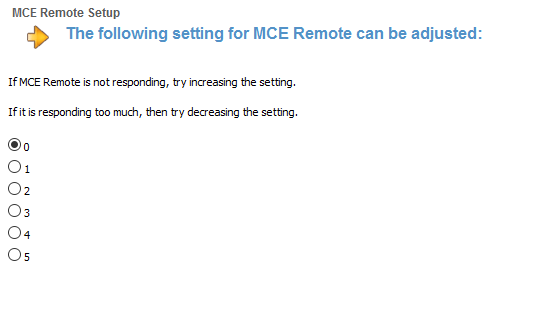
And on the next screen you select 0 instead of 1 (as it was in my case):

harm2

Well this fixed a lot of the problems, but in my case the control wasn’t still always working as it should and I noticed that the remote worked just fine by holding it right in front of Flirc.

How to solve this in a practical way?

You could try to place the Flirc dongle with a USB extension cable at a different place, use a remote extender or Logitech’s own RF based remote extender which works with the high-end Harmony remotes. Luckily my current Harmony comes with the RF extender so I assigned it to the MCE device, put the Flirc dongle in the Raspberry Pi and put the RF blaster output unit right next to it. Now I don’t need to worry about pointing the remote in the right direction.

More testing to be done, it’s a work in progress… but things seem to be better now.

And I’m also experimenting with another setting of the troubleshoot options:

harm4

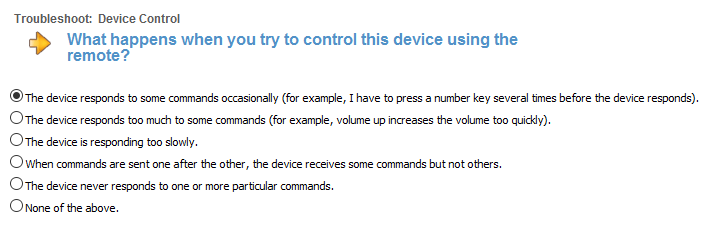
which gives access to

harm5

Zero is the default value and increasing it could also help to get rid if those nasty repeats are still happening.

Please let me know in the comments if this post has helped you to solve the problems or maybe you’ve found another way to get it working.

Cheers!